GameRig
Introduction
Learn how to set up GameRig and the essentials of how to use it to create your own rigs.
You might have heard about Rigify, an auto rigging add-on for Blender. It offers pre-made components that you can combine together to create rigs for pretty much anything.
Where Rigify falls short is when it comes to creating game engine friendly rigs. It was just not made with support for them in mind. If you need a refresher on what makes a rig game engine friendly, you can give my Rigging for Games tutorial another read.
Luckily the smart people who made Rigify have made it possible to extend its functionality by adding so called feature sets. And that is exactly what GameRig is. GameRig is a Rigify feature set, essentially a bunch of scripts that I wrote which add support for game friendly rigging using Rigify.
I have made GameRig free and open source. You can use it for any personal or commercial work.
The Auto Rigging Process
The usual way of making rigs is a mainly linear process. You create your armature and piece by piece you assemble your rig.
With auto riggers, the focus is on iteration. Instead of building up the rig by hand, you get some sort of an interface or guide that you use to specify what kind of rig you want to build. Then the tool builds that rig for you which you can attach geometry to and test. If there is something you want to change, you jump back into your guide, make adjustments and build again.
This guide is called a metarig in Rigify. We can start by creating a template metarig that GameRig ships with, or we can create an empty Armature and start adding rig pieces like legs, spines, fingers etc.. Each of these pieces will be made of one or multiple Bones that will guide the positioning and rotation of the rig, as well as a set of settings that allow us to further customize the rig.

Difference between Rigify and GameRig
There are three essential problems with Rigify when it comes to rigging for games:
- The deformation bones, which is the only part that needs to be exported, are not in a single bone hierarchy. For that reason, many unnecessary bones will be exported together with the deform bones. Besides this resulting in adding unnecessary complexity, it could also produce root bone issues. Unreal Engine, for example, will complain if your skeleton has multiple root level bones.
- Deformation bones are scaled. This can produce some weird behavior as scaling is handled completely differently in a Blender rig and in game engines.
- Bendy bones are used for deformation. While this will not produce any errors because these bones will be exported as regular bones, it is still not desired to have them in the rig. Mainly because the deformation you will see in Blender will not reflect how this deformation will look in the game engine.
GameRig solves all three of these problems. It puts the deformation bones in a single hierarchy for a clean export, scaling on deformation bones is disabled by default and there will be no bendy bones in the rig.
Types
What kind of rig gets generated is dictated by GameRig types. These can be assigned to any bone while in Pose mode. When a type is assigned to a bone, settings that allow us to further customize the rig generation will be displayed in the Rig Type panel (see UI section below).
Types have certain requirements in terms of the bone hierarchy. For example the arm type requires the bone to be the first in a three bone chain. The second and third bone will be used as the forearm and hand bones in the final rig generation. If this hierarchy is not present, rig generation will fail.
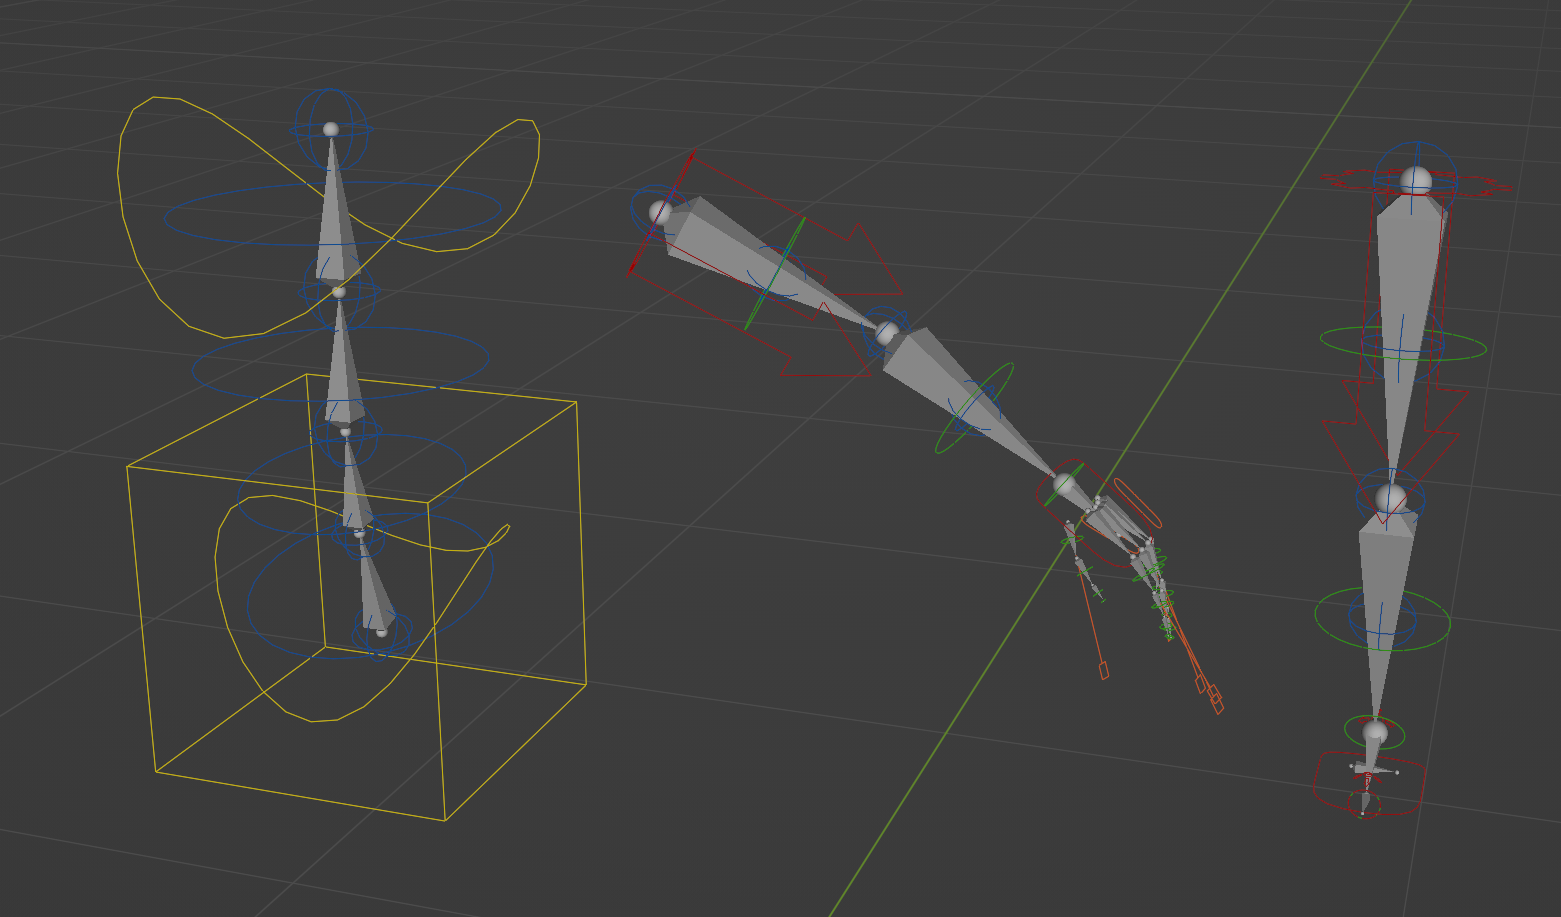
In the image to the left you can see three different types, game.spines.basic_spine, game.limbs.arm and game.limbs.leg. As well as a few instances of the game.limbs.super_finger type and a game.limbs.super_palm that make up the hand setup.
You can also see the rig controls that got generated from these types. Notice how the controls are positioned and oriented based on the gray source bones.
Hierarchy
This part is really important when working with GameRig as it is easy to cause rig generation to break if we don’t know what we are doing.
To explain this concept, let’s use the game.spines.basic_spine type. What it does is it takes any bone chain and makes it into a spine rig. The first bone will be the pelvis and the last bone the chest. A cool thing about this type is that the spine can be of an arbitrary number of bones. So how do we tell it to stop at a certain point in the chain? For example where the neck is supposed to start.
There are two ways we can do this. First is to disconnect the bone at which we don’t want the spine to continue. As you know Bones in Blender can be parented to each other in two ways, connected and disconnected. GameRig uses this property as a way to separate rig elements from each other.
A second way a break like this happens is when there is another type assigned to a bone in the chain. Meaning that in our example the neck can be connected to the spine, but if we assign game.spines.super_head type to the first neck bone the spine generation will automatically stop at that point.
There are some exceptions to these rules in some types. For example the leg type requires a heel bone as part of the setup, but this bone is to be disconnected from the foot bone. Otherwise it wouldn’t know which bone is the toe bone and which the heel if both were connected to the foot.
The exact bone chain requirements for each type are out of the scope of this tutorial. The easiest way to make sure all required bones are present is to create rig elements using the Samples feature.
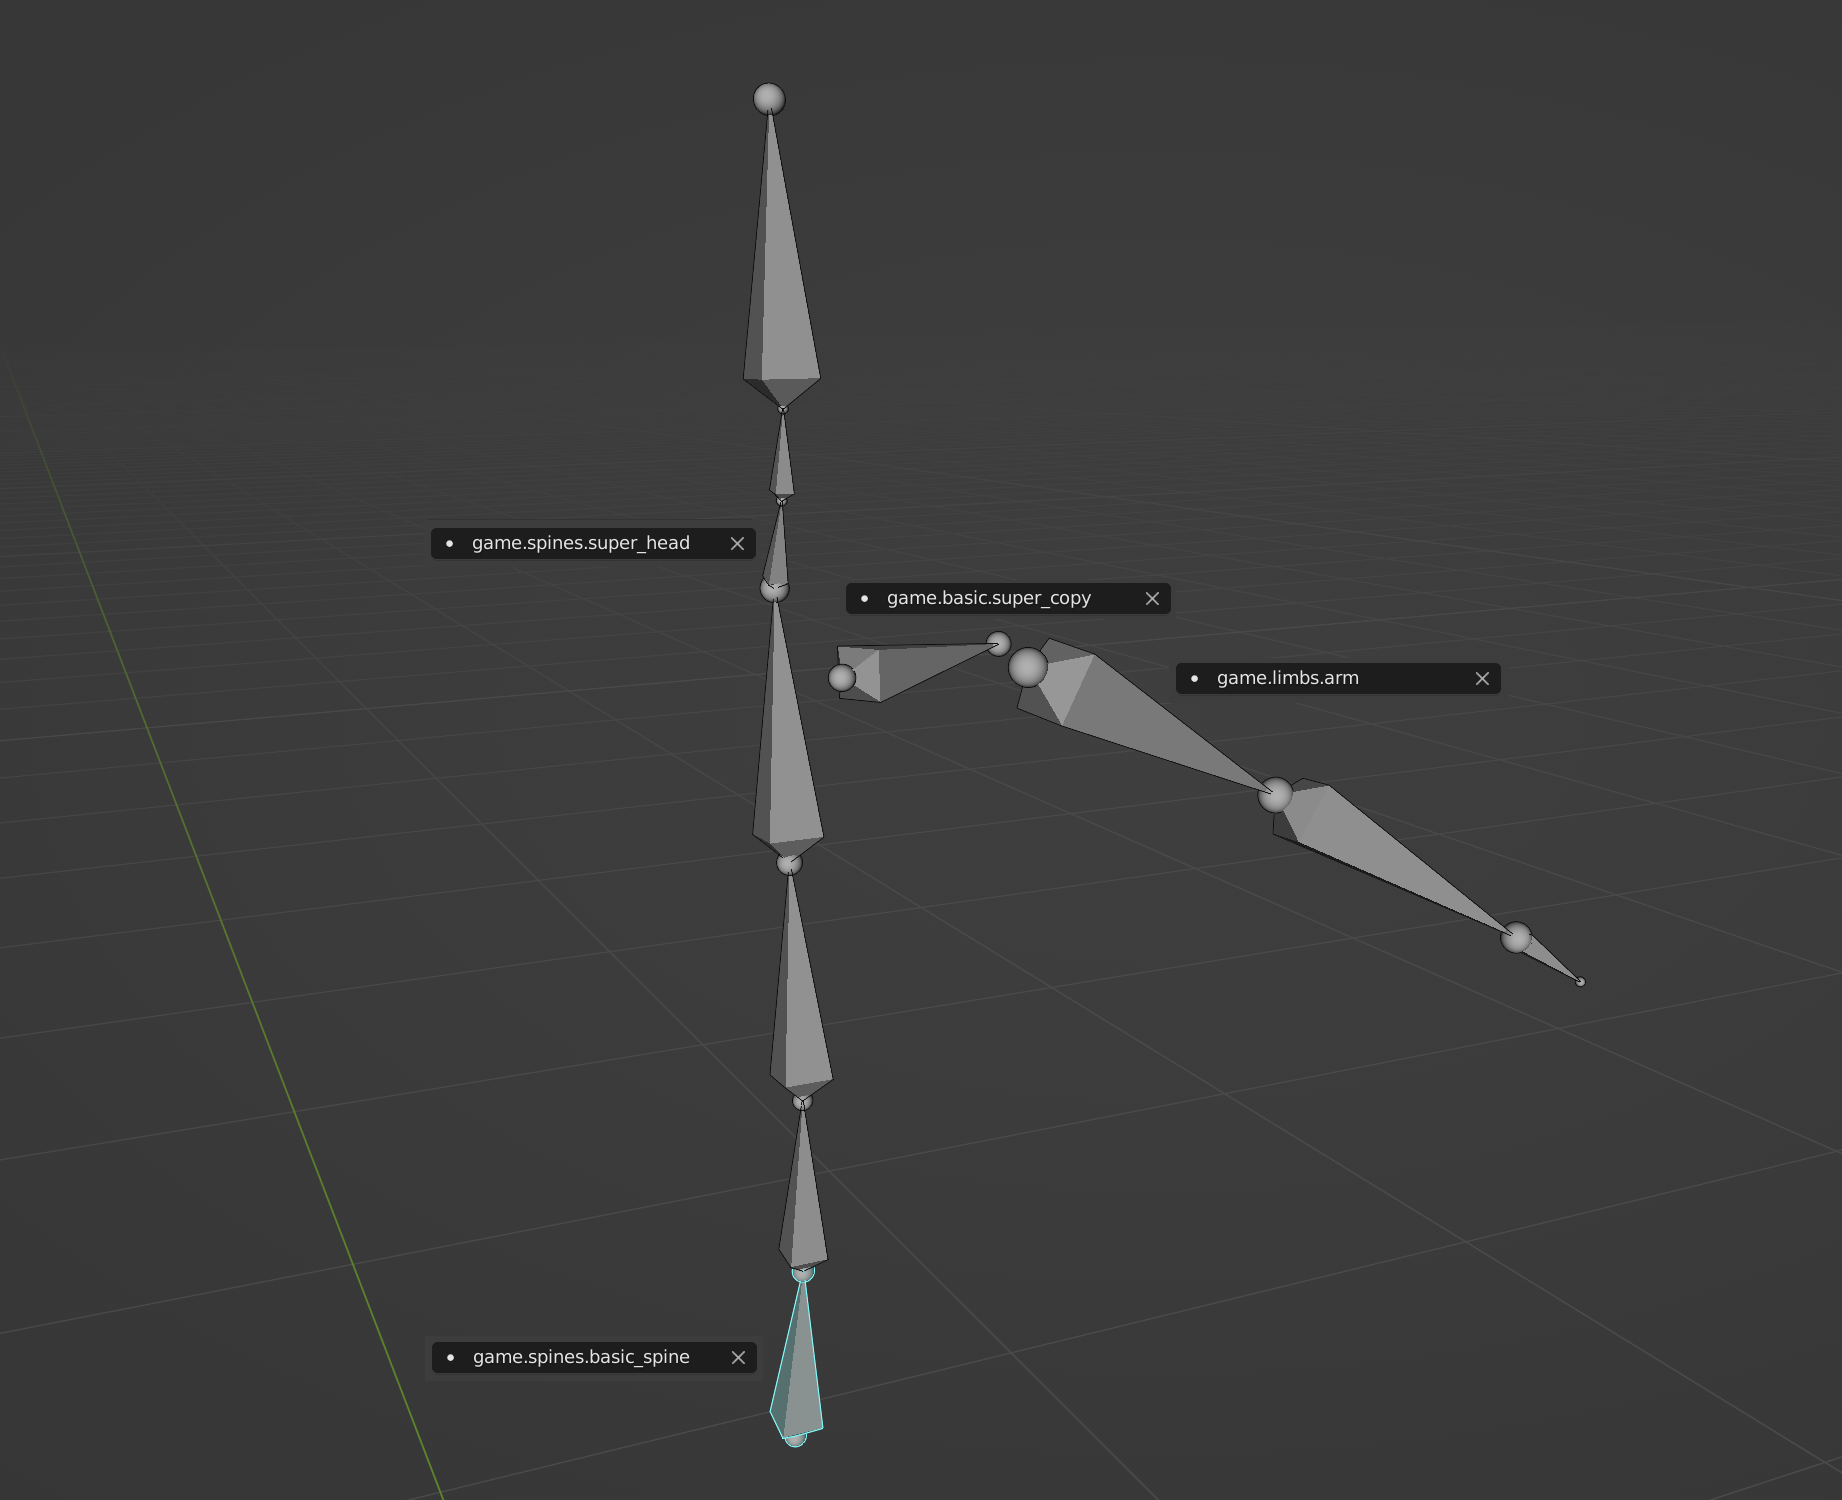
Here you can see how a basic spine, neck, shoulder and arm setup would be structured. Even though the spine and neck bones are part of the same chain, the spine will not span the entire length of that chain. It will stop at the point where it encounters another type, in this case the super_head.
Shoulder and arm types are parented to each other and the spine but they will be treated separately because they are disconnected from their parents.
Metarigs
A metarig is essentially a collection of information, or guide, that is used to generate the final rig. A metarig is made up of bones with GameRig types assigned to them.
GameRig ships with a large number of metarig presets that can be used as is to rig entire characters, or as a starting point for creating custom rigs.
Metarigs are created from the standard Add panel and are nested under the Armature sub menu.
Make sure to always add metarigs that have Game in the name when creating rigs for games.
User Interface
Main Panel
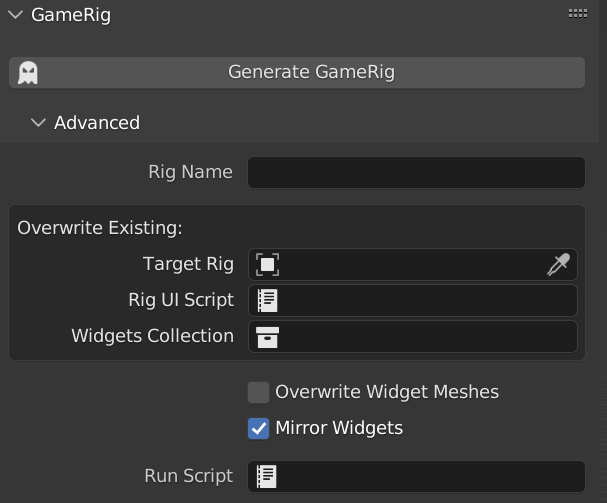
To get GameRig to show up, you need to have an Armature object selected. So go ahead and create an Armature and open up the side panel in the 3D viewport. if the Armature is selected, the GameRig section will show up.
- Generate GameRig: Builds the rig as a new object, leaving the metarig unchanged
- Rig Name: The name that will be assigned to the generated rig
- Target Rig: Rig generation can overwrite an existing rig. The first time you build a rig, it will be assigned to this field and every generation will replace it
- Rig UI Script: When a rig is generated, a UI script gets generated as well. This script can be adjusted or a custom one can be assigned to this field
- Widgets Collection: When a rig is generated, custom control shapes will be created for the rig controls. They are stored in a collection that gets automatically assigned to this field
- Overwrite Widget Meshes: Enable this if you want the previously created custom control bone shapes to be overwritten on next generation. Otherwise each new generate will not modify the existing widgets
- Mirror Widgets: If enabled, the left and ride side of the rig will share the same widget mesh. Otherwise a unique mesh will be generated for each side
- Run Script: Assign a custom python script to this field, which will be executed after every rig generation
Samples
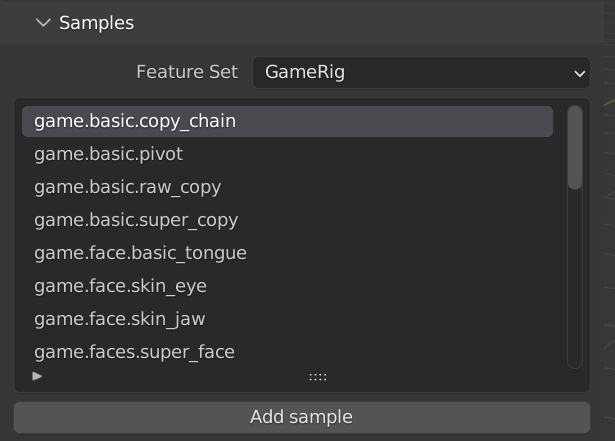
When in Edit mode, the Sample panel will become visible. A sample is just a preset rig element that consists of bones and adjusted parameters.
- Feature Set: Filters which samples will be shown in the list
- List: Choose which sample to add by selecting it here
- Add sample: When this button is pressed the highlighted sample will be added to the Armature and can be further adjusted
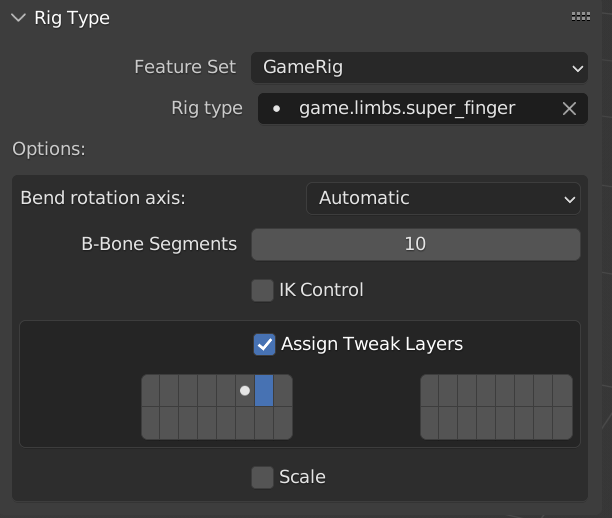
Rig Type
Displays rig settings for the active bone. First two options are universal while everything under Options depends on the assigned rig type.
Many types have a B-Bone Segments options, which is just a remnant of rigify and does nothing in GameRig. B-Bones are disabled for all GameRig types to make sure the rigs look the same as they will when exported to game engines, which don’t support b-bones.
- Feature Set: Filters which samples will be shown in the Rig type selection
- Rig type Assigns a rig type for the active bone
- Options: Available options depend on the rig type. These settings are used on rig generation
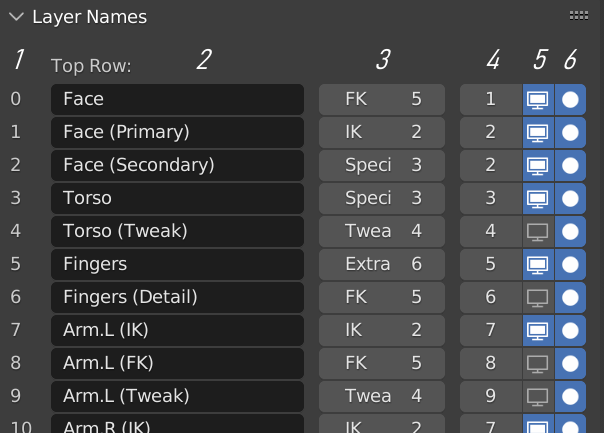
Layer Names
A lot of useful functionality is hidden under this panel. The rows represent armature layers. Assign metarig bones to different layers to have these settings be propagated to the rig they generate.
Last three layers are reserved by GameRig for non control bones.
- 1: Armature layer index
- 2: Name that will be displayed on the UI button for this layer. These button will toggle layer visibility
- 3: Assign a bone group to the layer (bone group = colors). Bone group creation is done in the Bone Groups UI panel (see below)
- 4: UI button row number for this layer
- 5: Toggle default visibility state
- 6: Toggle if a selection set is to be created. Bone Selection Sets add-on needs to be enabled for this functionality

Example for nr. 3

Example for nr. 4

Example for nr. 6
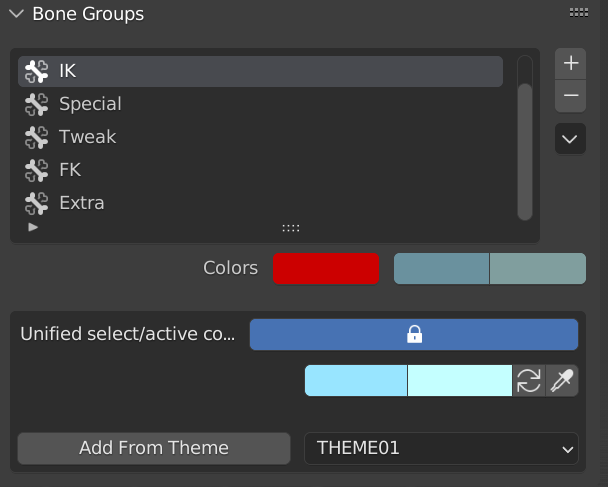
Bone Groups
This section allows for the creation and adjustments of bone groups. Bone groups are used for giving bones custom colors. Each group consists of three different colors. Each of them is used to represent a different selection states. These can be: active, selected and not selected.
- +/-: Add/delete bone group
- Chevron: Additional options
- Colors: Assign colors to selected bone group
- Unified select/active color: Toggle if the same color should be used for both select and active states
- Add From Theme: Add colors from predefined Blender themes